Friday, July 8, 2016

Under the Sea Blog Hop


Welcome to the 
Under the Sea Blog Hop
Thank you for joining us for an underwater adventure Under the Sea!
You should have arrived from SARAH but if you didn't Connie Can Crop is the first stop in this hop. This is a one day blog hop and we appreciate your leaving a comment for all of these amazing crafters.
We have a WONDERFUL sponsor this month!!

 
One lucky winner will win this awesome three pack of sequins!

Be sure to check out their shop online HERE
Visit them on facebook HERE
And their Blog HERE

What do you need to do to win? Easy... become  a follower of each of the fabulous blogs in this hop and leave each of them a comment letting them know what you like best about their projects.
You will have until 10 PM Sunday to finish the hop and leave your comments.
Winner will be announced on Wednesday 7/20/16 at Connie Can Crop.
Be sure to follow everyone and leave a comment along the way!

Mermaids Make Memories (say that fast three times)

This "under the sea" theme cried out - put a mermaid on it!!!


A center-step card using Miss Melissa Mermaid (colored her with alcohol markers), some punched out butterflies, a few water-colored flowers, a sentiment of "thinking of you", and a bit of glitz shows off a nice card to send to a shut-in. (Pardon my studio table, but you can see where I create)


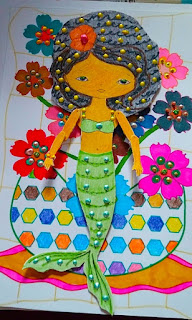
This mermaid, Mae, is a digi stamp that I colored and fussy cut for a bulletin board project at Vacation Bible School.


I added a fancy container with flowers as a background for her.  I used a regular coloring book page for the background and dressed it up with some sparkle and shine.  Mae is an articulated paper doll (meaning her arms can move) which adds interest to the project.

BTW - August 2 is National Adult Coloring Day - many libraries and other venues are encouraging adults to color to resolve stress issues.  It's fun and it's relaxing!!!


 Up next is the extraordinary KIM

Photobucket

Friday, June 10, 2016

Ships Ahoy Blog Hop


Welcome to the 
Ships Ahoy Blog Hop

Thank you for joining us as we set sail for a hop full of nautical fun!

You should have sailed in from ( JANET  ) Blog. If not, the Captain, Connie Can Crop is the first stop in this hop. This is a one day blog hop and we appreciate your leaving a comment for all of these amazing crafters.

We have a WONDERFUL sponsor this month!!


One lucky winner will win their choice of 3 files from their shop! 
Be sure to check out their shop online HERE
Visit them on facebook HERE
What do you need to do to win? Easy... become  a follower of each of the fabulous blogs in this hop and leave each of them a comment letting them know what you like best about their projects.
You will have until 10 pm Sunday to finish the hop and leave your comments.
Winner will be announced on Wednesday 6/22/16 at Connie Can Crop.
Be sure to follow everyone and leave a comment along the way!

Raise those anchors and batten down the hatches as we embark on this great adventure! All aboard!

"Put a Boat on It"

When Connie set up this blog hop, she stated that our projects should have a boat on it - mine does but it's "way different" than the traditional concept of a boat project.  For several months I have been making straw people for a display at our local library.  These have been stamped people such as Julie Nutting or Dyan Reaveley dolls and the occasional story book character.  This is the case for today's project -
Marie Antoinette straw person.

I colored her with a combination of colored pencils and alcohol-based markers, fussy cut her out, and mounted her onto a decorative straw.  She and the other straw people I've made will serve as a decorative centerpiece for a summer reading display.


 Up next is MIRANDA

Here's our line up in case you get lost.


Photobucket

Friday, May 13, 2016

Hats Off Blog Hop


Welcome to the 
Hats Off Blog Hop
Thank you for joining us today as we celebrate Graduates everywhere!

You should have arrived from Christi
If not please go back to the beginning.
Your first stop on this special hop is Connie Can Crop (LINK http://conniecancrop.blogspot.com). This is a one day blog hop and we appreciate your leaving a comment for all of these amazing crafters.

We have an awesome sponsor for this hop! 


One lucky winner will win a $15.00 gift certificate for their shop! 
Be sure to check out their shop online HERE (LINK http://www.polkadoodles.co.uk/)
Visit them on facebook HERE (LINK https://www.facebook.com/Polkadoodles)

What do you need to do to win? Easy... become  a follower of each of the fabulous blogs in this hop and leave each of them a comment letting them know what you like best about their projects.
You will have until 10 pm Sunday to finish the hop and leave your comments.
Winner will be announced on Wednesday 5/18/16 at Connie Can Crop.
Be sure to follow everyone and leave a comment along the way!

Hurray for the Graduate!!!!
 At 87 years young Ruth H got her degree!
My former school colleague went back to college and earned her degree this year.  She deserved a special card-in-a-box from me, so that's what she got, and that's what I have to share with you today as my project.

Here are some pictures of RH's Ciab for her surprise party.


Now it's folded down and ready for its envelope - Happy Graduation!!


Up next is Sheree

Here's our line up in case you get lost.

Connie- http://conniecancrop.blogspot.com
Alicia- http://goldengoddessdesigns.blogspot.com/
Kim- http://katydidcards.com
Cindy- http://www.cindys-greencricut.blogspot.com
Miranda - www.nanasscrapspot.com
Christi-http://tranquility1905.blogspot.com
Pam - http://lovebugcreations3.blogspot.com
Sheree- http://cardsandcraftsbysheree.blogspot.com
Lisa - http://lisaslittlerascals.blogspot.com
Sarah -www.sarahbiswabic.blogspot.com
And don't forget to enter this month's challenge:


Connie Can Crop Challenge #46
due 11:59 P.M. Tuesday, May 31st.
Pacific Time


Photobucket

Friday, April 8, 2016

Bee Happy Blog Hop


Welcome to the 
Bee Happy Blog Hop

We are buzzing with joy!! It's Spring, the birds are singing and the bees are buzzing! So happy you decided to join us in this fun bee themed blog hop today!

You should have buzzed on over from MIRANDA's bee hive. If not the Queen bee is Connie Can Crop and she is the first stop in this hop. This is a one day blog hop and we appreciate your leaving a comment for all of these amazing crafters.

We have an awesome sponsor for this hop! 


One lucky winner will win their choice of 3 their awesome files in their shop! 
Be sure to check out their shop online HERE
Visit them on facebook HERE
Follow their blog HERE for inspiration!
What do you need to do to win? Easy... become  a follower of each of the fabulous blogs in this hop and leave each of them a comment letting them know what you like best about their projects.
You will have until 10 pm Sunday to finish the hop and leave your comments.
Winner will be announced on Wednesday 4/20/16 at Connie Can Crop.
Be sure to follow everyone and leave a comment along the way!


A Card-in-a-Box - My First
A special card making pal was recently singing the joys of a card-in-a-box; she saw this on Pinterest.  I decided to try this style of card so I watched a ton of video tutorials and discovered that each one had different card element measurements so I had to decide which was going to be right for me.  I have to say before I actually made one I was very timid about creating the "Z" bands for the inside.  Not to worry - that was easy-peasy!!

After I made this I decided to try cutting out the elements with my Cameo - another great idea as there are many, many cards-in-a-box at the Silhouette store.  Thirdly, I purchased a Sizzix die set for a c-i-a-b and tried it out last night.  I personally like cutting these out with my Cameo but if I had to pick from the other two choices I would rather do the measuring and cutting myself.  I normally love Sizzix dies but this one was not a great investment.

  So - bottom line, one can cut this using a paper trimmer, scissors, and a score board OR let the Cameo do your cutting OR use a die set - three choices, but first you need to determine if this style of card is something you'd like to make (again and again).  I loved it!! You can fit it in a regular envelope for mailing and it is not some simple (a third-grader could make) card so it shows creativity, time-spent, and skill .  Give it a try if you've never made one.

A great visual c-i-a-b tutorial I found is HERE.  I will post the specifics and steps at the end of this blog if anyone wants to cut and paste the instructions.


Now onto Bees!! You Are Sweet As Honey!
So I made my C-i-a-b and I had to be mindful of bee colors so my card base was Stampin Up "so saffron" and my designer panels were black Graphic 45. My recommendation for this card style is use a nice sturdy card stock for the base - the idea of the card is to be displayed so you want something that will stand up, not pucker or fall down on the job!

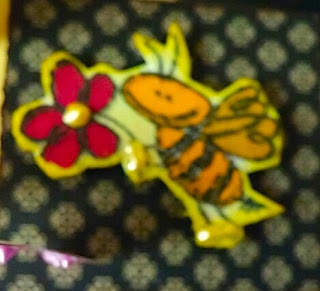
I have one set of bee stamps from CTMH so I inked them on watercolor paper, colored them with alcohol-ink markers, cut them out, inked the edges, used the sentiment that came with the set, and adhered them to the three panels for interest.  My two focal bees (those adhered to the Z panels of the card) were from Paper Piecing by Nikki.  This is a delightful set of bears disguised as bees - too cute!!  Liquid Pearls also add dimension, color, and interest.


I had to show off my Cutter Bee scissors - my go-to pair for anything I need to fussy cut!


 Up next is LISA

Here's our line up in case you get lost.

A set of instructions for a Card-in-a-Box:
1 piece of card stock cut at 9 x 5 ½”.  Score along 9” side at 2 1/8", 4 ¼", 6 3/8", and 8 ½".  Turn a quarter turn and score at 2 ¾”. 


1 piece of card stock cut at 3 1/8 x 3 1/8”.  Score at ½” and 2 5/8”, then cut in half so you have 2 pieces of card stock with score lines on either end.  These pieces will act as the “bridges” to hold up your elements.

7 pieces of card stock for the panel layers cut at 1 7/8 x 2 ½” and 7 pieces of Designer Series Paper cut at 1 5/8 x 2 ¼”.  Cut 3 pieces from one pattern and 4 pieces from another pattern.  1 piece of card stock for back panel cut at 1 7/8 x 5 ¼” and 1 piece of Whisper White/Very Vanilla card stock for back panel layer cut at 1 5/8 x 5”.  You can stamp a greeting on this or sign your name.  Coordinate either Whisper White or Very Vanilla based on the color scheme of the Designer Series Paper.


Step 1:  Cut on the 2 1/8", 4 1/4", 6 3/8", and 8 1/2" score lines up to the 2 5/8" horizontal score line.  Remove piece as shown to create tab to make the box.  Angle corners of tab for easy assembly.

Step 2:  Add Sticky Strip to the tab and form box.  Attach back panel to back of card, closest to the seam.  The back panel does NOT get folded.

Step 3:  Gently fold the 3 panels down.  

Step 4:  Use Sticky Strip on the tabs of the bridge or Z pieces, and attach to the inside of the box.  Make sure the bridges are inside the box and divide the space into thirds.  These bridges are what you will use to attach stamped elements to the card.

Step 5:  Attach panels to the card -- the 3 with one pattern of Designer Series Paper go along the bottom of the card, and the remaining 4 go on the remaining panels.


Photobucket

Friday, March 11, 2016

Once Upon A Time Blog Hop


Welcome to the 
Once Upon a Time Blog Hop

We are so delighted you are joining us in a land far far away!! We will be showcasing projects featuring only the finest princesses in the land! So come be inspired by our magical talents! 

 Connie Can Crop is the first stop in this hop. This is a one day blog hop and we appreciate your leaving a comment for all of these amazing crafters.
We have an awesome sponsor for this hop! 


One lucky winner will win a $20 gift card to shop their awesome files in their shop! 
Be sure to check out their shop online HERE
Visit them on facebook HERE
Follow their blog HERE for freebies and inspiration!

What do you need to do to win? Easy... become  a follower of each of the fabulous blogs in this hop and leave each of them a comment letting them know what you like best about their projects.
You will have until 10 pm Sunday to finish the hop and leave your comments.
Winner will be announced on Wednesday 3/16/16 at Connie Can Crop.
Be sure to follow everyone and leave a comment along the way!


Don't Mess With A Princess!!

This project started with the sentiment and evolved into a banner for the hop.  I used a Julie Nutting doll stamp and fashioned some handmade flowers for embellies.  I used liquid pearls for further texture and glitz on the princess dress.


The crown was stamped as well as the two sentiments for interest on the doll as a focal point for the banner.


The doll and the hair were stamped once; the dress was stamped twice.  All were fussy cut and pieced together. Then I mounted her on a piece of cardboard for sturdiness and cut once again. The hair was glossy-accented for shine.


I just followed along the dress lines with the liquid pearls.  I finished my project with a piece of pink ribbon for the handle.


 Up next is JANET

Here's our line up in case you get lost.


Photobucket